Remote SSH Text Editor through Visual Studio Code

Remote SSH Text Editor through Visual Studio Code
In this article, I will outline what is required in order to be able to remotely modify text files from a Visual Studio Code instance running from your workstation. It has made working on a remote file system significantly simpler, especially when having to modify configuration files on a remote system.
Requirements
- Ubuntu Linux instance with remote SSH access.
- Sudo privileges to a Ubuntu Linux instance.
- Visual Studio Code.
- Remote VSCode extension for Visual Studio Code.
Configuration
The following sections will cover what is required in order to setup both your Visual Studio Code instance, as well as your running Linux instance. Ensure that you have root or administrative privileges to your running Linux instance.
Visual Studio Code
Install the Remote VSCode extension for Visual Studio Code. This extension will enable launch a run-time during the launch of Visual Studio Code which will enable for text file editing over a listening SSH tunnel.
Configuring Remote VSCode Extension
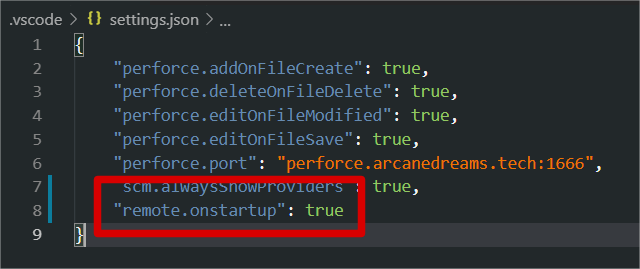
Modify your user or workspace settings (whichever you prefer), and specify the following properties. This configuration file can be found in the .vscode directory of your workspace. Alternatively, you can modify your workspace settings by using CTRL + P and searching "workspace".

User settings required for configuring Remote VSCode extension.
This property will ensure that the required run-time for opening a connection with rmate will be running and listening when Visual Studio Code launches. This local run-time will enable for you to open remote files over a SSH connection, that will be configured and setup in the next section.
Configuring Linux server over SSH
Connect to your running Linux instance over SSH, and ensure that the user account user has sudo or elevated privileges. Next, you are going to want to download the latest version of the rmate script from the GitHub repository that it resides in.
The following set of commands will download the script at head revision from the GitHub repository to the correct location on your running Linux instance, and will modify it's file permission properties so that it can be executed anywhere by any account or group on your running instance of Linux.
#!/bin/bash

# This should work on Ubuntu 18.04+

sudo wget -O /usr/local/bin/rmate https://raw.github.com/aurora/rmate/master/rmate
sudo chmod a+x /usr/local/bin/rmate
rmate should now be available to you anywhere you navigate to through the terminal, as the script has been stored under the /usr/local/bin/ directory, and has been granted permissions to execute.
Setting up PuTTY (Windows)
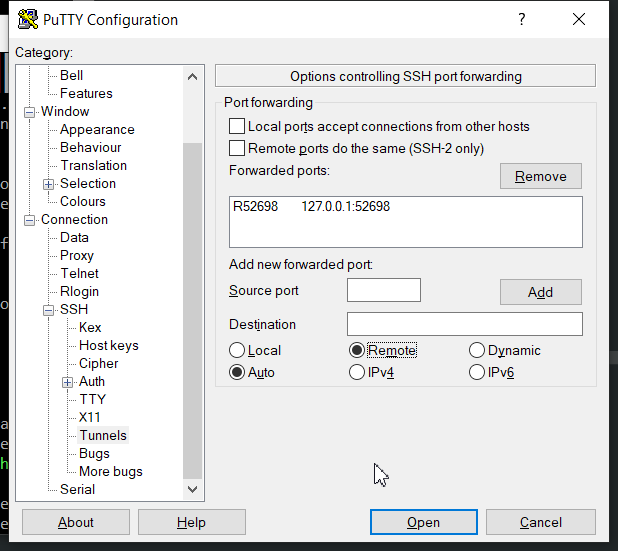
Ensure that you have PuTTY installed on your machine, and that you can successfully establish a SSH connection to your running Linux instance through the tool.

A screenshot of PuTTY with the remote port forwarding configuration options assigned.
Testing connectivity
Once you have successfully configured your PuTTY instance, connect to your running Linux instance and navigate to the file that you wish to have opened in Visual Studio Code. Run a separate Visual Studio Code instance, and ensure that the SSH listener is running in the background.

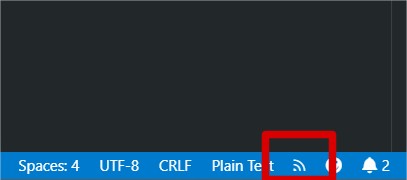
You should notice this little icon in your status bar for Visual Studio Code once you have successfully established a connection with the target machine over SSH.
Usage
To open a remote file from your terminal into a running Visual Studio Code instance on your machine, simply run the following command.
In this example, I am opening a configuration file for NGINX.
root@your-machine-here:/etc/nginx# rmate nginx.confYou should notice that after running this command on the remote system that the file will automatically open in your running Visual Studio Code instance. Magic!
Further Reading
Comments
Comments
You actually suggested this exceptionally well!
<a href=https://homeworkcourseworkhelps.com/>do my accounting homework</a> coursework <a href=https://helpmedomyxyzhomework.com/>custom coursework</a> do my homework
Thanks a lot. Good information.
riversweeps 777 online casino app <a href=https://bestonlinecasinoreal.us/>x games online casino</a> nj online casino list
Amazing quite a lot of terrific information.
expert essay writers <a href="https://eseomail.com/">write my essay for free</a> write for me an essay